Thursday, July 26, 2012

Glazed Strawberry Cake Recipe from Esscents


I learned about Esscents soaps when I came across them on Twitter and I have been a fan ever since. Audrey Rosenfeld and Paige Eaton are the two friends behind Esscents – Scents, Soaps and More.  They handcraft a wide variety of soaps, lotions, lip balms and other luxurious bath and body products. I asked Paige to share a fabulous recipe, perfect for this time of year - Glazed Strawberry Cake!


Ingredients
- 1 box white cake mix
- 3 heaping tablespoons of flour
- 1 package strawberry gelatin
- 1 cup cooking oil
- 4 eggs
- ½ cup of water
- 1 package frozen strawberries
- 1 can of white frosting 


Directions
Preheat oven to 350 degrees.  Make sure strawberries are totally defrosted.  If using whole strawberries, cut into small pieces.  Mix cake mix, flour and gelatin and add in oil, beat in the eggs.  Add water and ½ the package of strawberries.  Mix well – best to use an electric beater for a fluffier cake.   Make sure all the strawberry pieces are blended.  Bake in greased tube or bundt pan for 35-40 minutes. Take out and let cool. 


Glaze
Melt ½ can of frosting in microwave until it reaches a glaze consistency.  Use some of the leftover strawberry juice to mix in to give the glaze a light pink color, then drizzle over cake when it is cool, but not cold. *


Adapted from The Junior League of Baton Rouge’s River Road Recipes cookbook:  http://www.juniorleaguebr.org/?nd=recipes  


I don't know about you, but my mouth is watering! Not only does this cake look delicious, so do many of her soaps. Would you believe this Lemon Chiffon Cake is actually soap?


Based in Washington state, they use good-for-you ingredients such as moisturizing glycerin and skin-softening goat’s milk and oils. They don’t use sulfates, detergents, parabens or other harsh chemicals.


If you are planning a wedding, shower or party, be sure and check out Esscents’ selection of soap favors - a unique item that guests can take home and enjoy well after your special event. Esscents’ soap seashells, hearts and daisies are their most popular favors for weddings and showers. These pretty, decorative soaps can be custom made with your choice of color, fragrance and packaging. 


Audrey and Paige also create fun favors for children’s parties such as cupcakes, dinosaurs, trucks, butterflies and zoo animals.  They come in bright colors and kid-friendly fragrances. Esscents also makes custom gift-boxes of decorative soap for birthdays or hostess gifts or, even better, a gift to yourself!You can see their large selection of soap favors and other types of bath and body products at www.esscents.net


You can also find them blogging at www.esscents.wordpress.com, on Facebook at www.facebook.com/esscents and on Twitter at www.twitter.com/esscents

Friday, April 13, 2012

A Cottage Chic DIY Project

It's been awhile since I've posted as our family has been busy on a much-needed and enjoyed vacation and then knee surgery for my husband. But I am back with a fabulous guest post from Blessy of Stellar Tatter and I hope you love it as much as I do...

Hello, ShabbyNChic readers! It's Blessy here from Stellar Tatter sharing a little project that I have been working on during these past few days (with the help of my sister). This is my first time guest posting, so I'm very delighted and excited and I hope you will enjoy this simple upcycling project which you can also try making in your spare time.

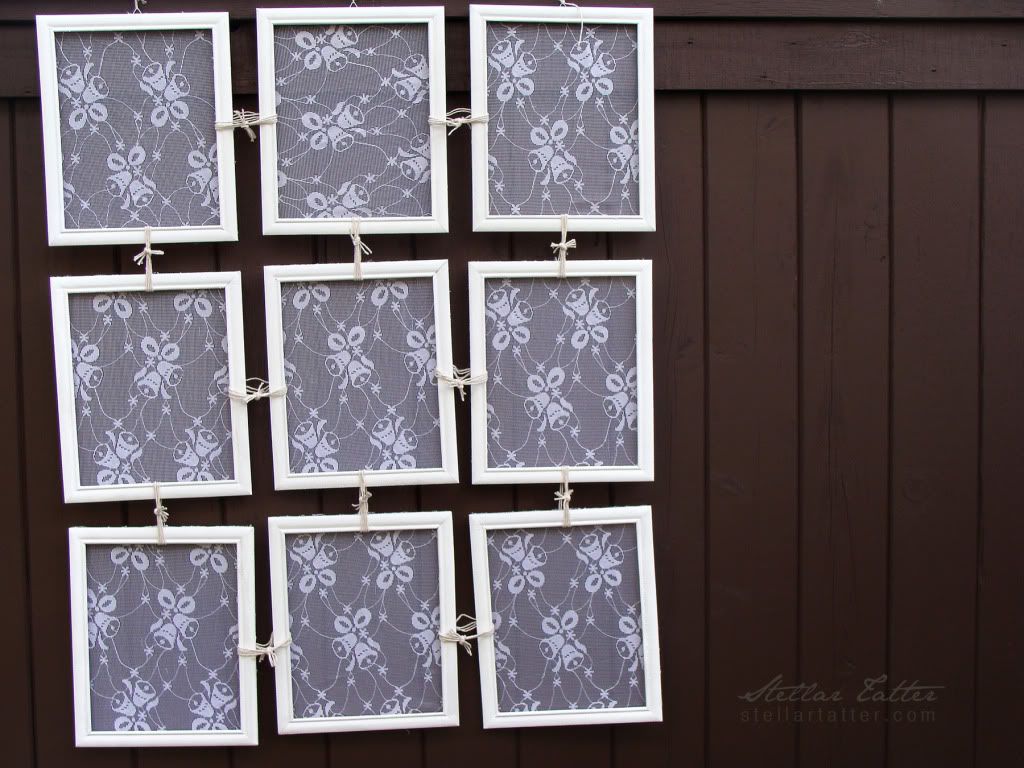
I have these nine wooden photo frames that were sitting around in my room, waiting for the perfect opportunity to be used. My original plan was to use them to display retro-inspired craft paper and hang the frames one by one above my bed to compensate for my lack of a huge headboard. But one time, I found this beautiful framed vintage print at the thrift store and decided that I wanted that better as a space-filler above my head; so my lonely frames were left once more to rekindle with the dust under my bed.

But not for long! Because here they are being transformed into something cottage chic!


I took out the glass and the cardboard backing from each frame (saving them up for another project) and painted the natural wood with white acrylic paint. This is my first time to use paint for repurposing items, so I feel like I made a silly mistake of using a spray can when I could probably just used a good ol' paintbrush. It was faster, though! For touch-ups, I still had to do with the brush.


I bought this long strip of lace curtain at the thrift store which I cut into rectangular pieces that were large enough to fit the entire frame. As it turned out, the length was perfect for nine frames! Whew, didn't have to make another run to get an extra one! If you ever decide to try this, too, you can use any old lace curtain or fabric that you have in hand. 


Using a glue gun, I glued the fabric onto the frames, leaving little gaps in the middle for inserting strings (see photos below). At first, I was applying the hot melted glue on the wood before I let the fabric sit on it (as seen in the photo above), but later on, I've decided to lay the fabric on the wood and then let the glue seal the two by applying it on top. That made them stick together better and more securely. When the glue had finally cooled and hardened, I trimmed the excess material off of the sides of the frames.


To join them all together, my sis and I tied them up with hemp twine, inserting the strings into the unglued slots. A little more trimming and we're all done! We also used twine to hang them up, but you can use ribbons or long chains (which I would've used if they were available to me).


Et voilà! A cottage-chic hanging decor that can be used for tons of purposes!


Aside from being a wall decor, it could also serve as a room divider (add more frames to fit the space!). It could also be a fun alternative to curtains! Or if your bed is headboard-less like mine, then this would make for a pretty country chic headboard! Whatever it may end up being used as, it would really be a nice focal point. And the best thing of all, it was pretty cheap to make! For $15 or less, you can have your very own framed lace hanging decor. If you're super resourceful, you might end up not having to pay a buck.
Have fun and happy crafting!

A very special thank you to ShabbyNChic for having me here! I had fun making this for her blog. Hope to catch you all as well on the other side at my online abode, Stellar Tatter. Drop by sometime and bring biscuits! :)


**You can also find Blessy on Twitter and Facebook.

Thursday, March 1, 2012

Giveaway Winner Announced!

I had a quick giveaway on Twitter and the winner of the one-of-a-kind wall rack is:
@hockmangirlsmom


Congratulations to the winner and thanks to all who entered. Stay tuned here and on Twitter for more giveaways to come!

Tuesday, February 28, 2012

Fast Free Giveaway


I'm giving away this one of a kind wall hanging. It is painted an antique white with a distressed finish. There are 2 oil-rubbed bronze hooks for hanging:
- coats
- aprons
- keys
- leashes
- cups...


It comes ready to hang and includes shipping price (U.S. and Canada only). See my Twitter page to enter - 30th retweet wins it!

https://twitter.com/#!/ShabbyNChic


Wednesday, January 25, 2012

Cute and Easy Tutorial: Storage


I love this idea because it is easy, fast, inexpensive, uses items you probably already have and in the end you have more storage. What more can we want, right?!


Supplies:
- glass jar (with a circumference of less than 12 inches)
- scissors
- ruler or tape measure
- pencil or pen
- decorative paper (long enough to go around the jar once)


Really, that's it!!


Find decorative paper that you love. (This is my favorite part.)


Measure the height of the jar where you will be placing the paper. Then mark that measurement across the paper longways. 


Cut the paper across following your pre-measured marks.


Roll the paper enough to fit it in the jar and place it inside.


That's it! You have a pretty jar to store office supplies, craft supplies... 


Be creative. Use vintage paper, wallpaper, comics, kids' art work...

Friday, January 13, 2012

Hollywood Regency Decor

The new rage in home design is Hollywood Regency style. It really is what you would think from the name - stylish, over the top, dramatic design. Nothing plain and simple here.


Elements associated with Hollywood Regency:


Glitz and glitter and shiny surfaces like metallic finishes and glossy or lacquer-finish on furnishings.


Classic, yet glamorous designs.


Ornate details in light fixtures, furnishings and this checkered floor. I love this floor!


Fabrics in bold, but simple color and rich in texture.


Drama, don't forget the drama of Hollywood!


What do you think of Hollywood Regency style - love it, hate it or somewhere in between?

Tuesday, January 3, 2012

Side Table - Before and After


I found this side table in great structural shape, but it needed beautifying. First, it was filthy so I cleaned it up. 


I liked the cream color, so I repainted it cream, but gave it a boost with a robin's egg blue for the drawer.


I love how it turned out!